Mathieu Favréaux
|
0
|
November 30, 2023


The entry "Damn Deprecation"proposed by the DGA as part of the 2023 DG’hAck challenge was really fun to solve. Although some dynamic analysis helped, Timeless Analysis with esReven wasn’t needed during the investigation. Still, a write-up deemed interesting enough.
Translated to English:
Your sysadmin is away, and you must fill their shoes.
Management no longer has access to the company’s HR data, and they asked you to restore the service (API) ASAP.
You’ve been given free rein.
There are 3 flags to find, the last two being categorized as “Simple” and the first one being “Hard”.
We are given root access to a remote machine via SSH. Upon login, we are greeted with a ransomware’s message:
Attention !
Your data has been exfiltrated and encrypted by our malware.
[…]
Looking around the machine we can assess the situation:
ss -lp reveals a listening service named ssrh, which is the API entry point we must restore. It is stored in /opt/ssrh./opt/ssrh/instance, we find the file database.db.pwned, the RH database encrypted by the ransomware. The original, of course, has been deleted.The service is down because a ransomware encrypted the service database. Can we decrypt it?
The network activity on the machine reveals frequent HTTP requests to a machine at 192.168.1.2:
GET /cmd returns {"command":"","message":"Command send successfully !","status":"OK"}GET /ping returns {"command":"","message":"Yep, I am listening !","status":"OK"}There is a fair chance that our ransomware talks to a C2 on 192.168.1.2. As it turned out, the same SSH credentials we were given for the victim machine also worked on that one (!), and we could find the file server.py that hosted the C2 service. In it we find a flag in cleartext, supposed to be sent in an obfuscated manner via the command /hex. This command also sends a key and an iv, the latter of which isn’t used in the obfuscation of the flag.
As it turned out, accessing the .2 machine wasn’t part of the challenge, as this bypassed part of it - however, we’ll be doing things the right way later on anyway. Shortly after this connection, the C2 credentials were changed, and access closed.
For now though, we found our first flag (which is flag nb 2). along with two hex strings.
f5c9c10d2e83a4a38549016b7bed672f # keybe5dc32f7a610984 # ivThe flag is obfuscated on the network using key, but keyand iv are passed in clear text in this /hex API entry point. Note, the comments “key” and “iv” are part of the file, that might come in useful later.
With this we might be able to decrypt the database. Let’s try to learn more about the encryption by dropping files on the file system in /opt.
empty.db.pwned
0000000 b281 9892 f8c3 e95d afeb 7564 69fd e7e4

1.db.pwned
0000000 336c bc9b 0681 4103 6af4 cbdc a8ce 19fe

15.db.pwned
0000000 5c6d dbda fef4 2145 b912 9201 6f9a 2100

16.db.pwned
0000000 5817 cc38 9449 ddae 9638 78f5 173d 5c99
0000010 c3ec 6ff8 2f33 85c1 de31 1ab1 b012 c0de

64.db.pwned
0000000 5817 cc38 9449 ddae 9638 78f5 173d 5c99
0000010 cc67 cc4d db55 7ac9 6a7b cb19 9d1d 3a99
0000020 3adf 4db1 6eff bfff 19b3 3892 9aa1 e5cb
0000030 7d7a ce2d db65 1eb4 17e7 bbd8 6a2f 3606
0000040 22f6 d870 9050 2cbf 756d 9be2 8454 9224

64-copy.db.pwned
0000000 5817 cc38 9449 ddae 9638 78f5 173d 5c99
0000010 cc67 cc4d db55 7ac9 6a7b cb19 9d1d 3a99
0000020 3adf 4db1 6eff bfff 19b3 3892 9aa1 e5cb
0000030 7d7a ce2d db65 1eb4 17e7 bbd8 6a2f 3606
0000040 22f6 d870 9050 2cbf 756d 9be2 8454 9224
We learn that:
.pwned file - the encryption probably works on 16-byte blocks, with a padding of at one byte minimum.After multiple attempts at decrypting the database with this information, we find that we simply need to use AES:
In the resulting SQLite database, we find the next flag, which is flag 3.
And now the real challenge starts, because we did it all wrong:
We need to start fresh.
Not knowing much about linux forensics tools, and seeing how nothing obvious popped in a simple ps aux command, we can try to dump the system’s memory. But that leads the realization that the kernel is pretty locked down:
/dev/mem./boot.It’s clear that at least part of the ransomware sits in the kernel and is plugged in the syscalls to restrict what user-land processes can do, and we can’t insert kernel code either. This rules out using LiME or other such tools to grab information there, as their require loading kernel modules.
However, the unhide command can, by comparing results to various entry points, reveal hidden PIDs if there is an inconsistency somewhere. And sure enough:
root@debian12:~# unhide-linux quick
[...]
Found HIDDEN PID: 484
	Cmdline: "<none>"
	Executable: "<no link>"
	"<none>  ... maybe a transitory process"
Killing this process works, and seems enough to stop dropped .db files from being encrypted. So there are both a kernel and user-land components to the ransomware.
At this stage, a lot of uninteresting exploration went on, but one detail in particular can grab our attention: while there is a Python virtualenv for the ssrh app, there is also a system-wide Python Crypto package install. Could our ransomware be a python script?
Let’s hook on top of /usr/bin/python3.11:
exec the moved binary.We find that yes, something is indeed started at boot:
FREEBEER that contains a chain of “x” characters.Executing the payload manually after setting the K and I variable works and effectively starts the ransomware (dropped files get encrypted), this time visible in ps.
If we decrypt the payload manually (again, using AES in CBC mode), we get a Python bytecode file (a .pyc) with many functions.
We are still looking for flag 1. Could it be somewhere in this file?
I’m aware of two tools that can help decompile python bytecode, uncompyle6 and decompyle3 but apparently none of them work on 3.11. We can fallback on pycdc, which again does not manage to properly decompile the bytecode but at least produces a disassembly. Or, finally, Python’s dis module will do the trick.
We see the following interesting functions:
main: takes host and port in argument, will be helpful for testing purposessend_messages: seems to orchestrate the whole process of finding files & encrypting them.encrypt_file, find_files & shred_file: self explanatory. The encryption scheme confirms the AES parameters we found earlier, and how the keyand iv hex strings are used.hex: seems to handle the /hex command, calls compute.compute: seems fishy: obscure variable names, parses a string from hex.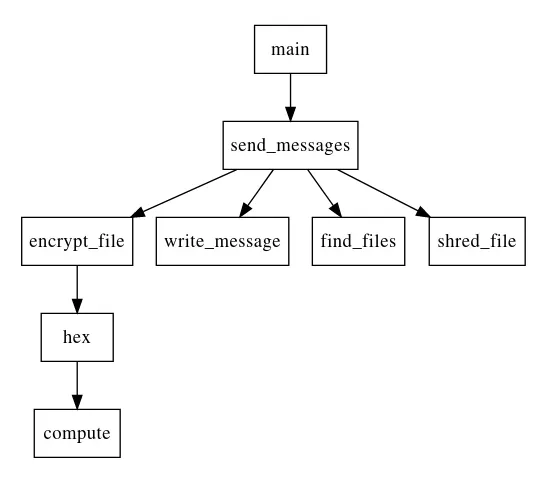
Having still not found anything resembling a flag, we can try to take a closer look at the compute function. It’s a little obscure, especially since it seems to use quite a bit of external context: we are dealing with nested functions.
Instead of squinting too hard on the disassembly here, we could try to isolate the function and execute it to get its result. However, that proved harder than expected:
Moreover, part of the context is the result of the call to the /hex API. It would be much easier to patch the function’s bytecode to force it to print its output before returning! This will look a bit like this:
import client # Our target is in client.pyc
import dis

# `compute` is nested in `main`
original_compute = client.main.__code__.co_consts[10]

# Copy context from the function
co_code = original_compute.co_code
co_names = list(original_compute.co_names)

# Append the global so we can use the print function
co_names.append("print")

# Edit the function's bytecode
save = co_code[284:]
co_code = co_code[:284]
co_code += b't\x07\x00\x00\x00\x00\x00\x00\x00\x00\x00\x00' # LOAD_GLOBAL 7 (NULL + print)
co_code += b'|\x02' # LOAD_FAST 2 (un)
co_code += b'\xa6\x01\x00\x00\xab\x01\x00\x00\x00\x00\x00\x00\x00\x00\x01\x00' # PRECALL / CALL / POP_TOP
co_code += save

# Perform replacement
co_consts = list(client.main.__code__.co_consts)
co_consts[10] = original_compute.replace(co_code=co_code, co_names=tuple(co_names))
client.main.__code__ = client.main.__code__.replace(co_consts=tuple(co_consts))

# Check resulting code
dis.dis(client.main.__code__.co_consts[10])

# Call patched binary
# doFork=False avoids successive forks, and keeps stdout visible.
client.main(dofork=False)
And once we get it working (by connecting to a live C2) we get… flag 2 of course, the one we already got in cleartext previously. This time at least, we got it the legit way, and with the other information we got from the pyc file, we have the required information we’d need to decrypt the database to get flag 3 legitimately. So we’re back on track, but still not sign of flag 1.
We need to look elsewhere. At this stage, more exploration was necessary, and it revealed that:
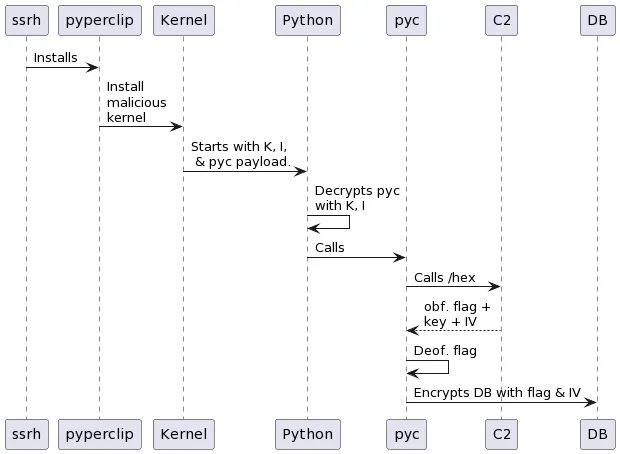
ssrh’s dependencies named pyperclip pointing to a malicious repository on github. The setup.py downloads and installs a custom kernel in version .66./etc/apt/source.list), but the package has been cleaned and the repository isn’t accessible anymore./boot, nor can we edit grub.cfg to boot an earlier version.The install chains looks like this:
What we don’t know at this stage is:
FREEBEER about?It seems likely that there is some backchannel from user-land to kernel to instruct it to hide a process, and maybe this would even provide a way to unlock everything. However, I couldn’t manage to find anything there - is it a write to a particular device, an ioctl, something else?
After testing numerous other things, trying harder at fetching the kernel binary did the trick:
/boot, and we can’t write anything to it, moving it to a different location does unlock write access.vmlinuz-6.1.66 no matter its location, similarly we can’t write any file named grub.cfg. We can delete those files though.grub.cfg, so we can copy it someplace else, alter it, and remove the original. Then, somehow we are allowed to create a symbolic link from the copy to the original, effectively enabling to select a different kernel to boot on./boot back to its original location, reboot, and voilà!Note: most forbidden accesses trigger a system log, which was helpful in experimentation.
Note: after discussing with the creator of that part of the challenge, this was not the intended way of solving this, and the kernel’s binary was meant to stay out of reach. It turns out we could have read the System.map or kallsyms file and compare them to previous kernel maps - this would have pointed out the added, malicious code’s symbols, and hinted enough at what was possible to move forward.
Filling the kernel symbols with the kallsyms will help us there. Then, following the string FREEBEER immediately reveals interesting functions:
__p5d deals with some form of crypto or obfuscation in at least 2 cases depending on the last parameter.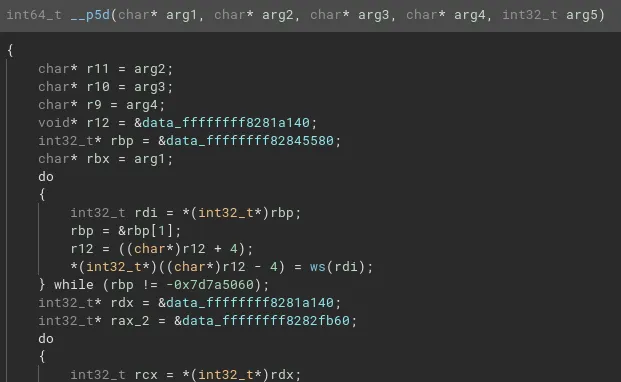
amt, then tcb seem to be where our python payload is started from, using call_usermodehelper_exec. The payload is deobfuscated with __p5d.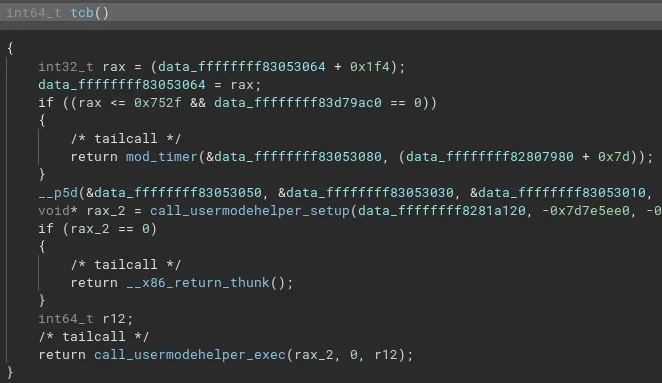
__x64_sys_hide is a new syscall that calls pf.constprop.0 which in turn seems to look for the string FREEBEER=xxxxxxxxxxxxxxxxxxxxxxxxxxxxxxxxxxxxxxxxxx in the calling process memory, and if it is present, replace its content with something from __p5d. 
Once again, reversing __p5d seems like way too much work. Fortunately, it seems this function relies on very little data that we don’t have: most of the sources are static and present in the binary. This means executing the function should be easy with unicorn.
Using a colleague’s script to load the ELF in unicorn, then reproducing the input arguments where necessary, we can execute the function in question. The gist of the unicorn script is:
# Skipped: ELF loading

# Allocations
stack_addr = 0x1000000
stack_size = 100 * 0x1000
uc.mem_map(stack_addr, stack_size)
heap_addr = 0x2000000
stack_size = 100 * 0x1000
uc.mem_map(heap_addr, heap_size)

# Input: environment variable
uc.mem_write(heap, b"FREEBEER=xxxxxxxxxxxxxxxxxxxxxxxxxxxxxxxxxxxxxxxxxx")

uc.reg_write(unicorn.x86_const.UC_X86_REG_RSP, stack_addr + stack_size / 2)
uc.reg_write(unicorn.x86_const.UC_X86_REG_RDI, 0)
uc.reg_write(unicorn.x86_const.UC_X86_REG_RSI, 0)
uc.reg_write(unicorn.x86_const.UC_X86_REG_RDX, 0)
uc.reg_write(unicorn.x86_const.UC_X86_REG_R8,  0xf1a30cb6)
uc.reg_write(unicorn.x86_const.UC_X86_REG_RCX, heap + 9)

uc.emu_start(0xffffffff81000ab0, 0xffffffff81001040)
print(uc.mem_read(heap_addr, 0x34))
And we get our flag 1!
Note: here the intended way of solving the challenge was to discover the new syscall, make up its arguments, then call it from user-space. It would replace the variable in the program’s memory for it to print out.
This challenge was captivating and challenging, and required a lot of searching around and reaching for multiple techniques I’m not too familiar with, like disassembling Python bytecode. All in all a nice learning experience.
Thanks to the challenge creators & admins for their responsiveness and patience, and looking forward to next year’s installment.


