Guillaume Vinet
|
0
|
June 21, 2024


Continuing our blog series on evaluating the resilience of MCUBoot v1.9.0 against fault injection attacks through binary emulation, let's delve deeper into our findings.
In the first post, we introduced MCUBoot and described an attack scenario aimed at executing arbitrary code.
The second post detailed how the emulation led us to highlight a sensitive code area for our attack.
Now, in this post, it's time to execute the attack and analyze the results. The experimentations led to unexpected insights! This demonstrates that a higher security level does not always equate to better security. Fortunately, through binary emulation, it is possible to identify the root cause and gain a clear understanding of the underlying issues.
IoT devices become more prevalent in critical applications, they become attractive targets for attackers. As a result, attention grows about potential fault injection attacks against such devices, and particularly for their most sensitive functions, such as the boot loader. Two factors highlight this:
Now, let's focus on stressing the firmware by simulating faults during the binary execution. A fault model is a representation of the effect on the chip coming from a physical disruption, such as laser, electromagnetic fault injection or glitch… It must be chosen, as close as possible to real case physical fault attacks.
Physical experimentations usually lead to such fault models. To simplify the characterization of a fault model, we can use these three key categories:
1️⃣ Impact on the code:
2️⃣ Duration:
3️⃣ Granularity:
So, how to best choose the fault injection model? This is highly dependent on the chip technologies and the fault injection technique. With the emulation, it is possible to cover many fault models in an efficient way. This means executing the same code and applying the different fault models one after the other.
MCUBoot, as a secure bootloader, is therefore a relevant reference. MCUBoot is designed to work with various chips, each with different or unknown levels of hardware security. Recognizing this, ARM introduced fault injection countermeasures in mid-June 2020 to help developers using MCUBoot enhance the security of their products and mitigate these threats effectively.
These countermeasures rely on two main principles: code redundancy and integrity verification. However, they impact secure firmware by increasing the code size and slightly slowing down execution. While these issues might be minor due to the increasing power and memory capacity of chips, they can pose problems for IoT devices, which need to be cost-effective and highly responsive.
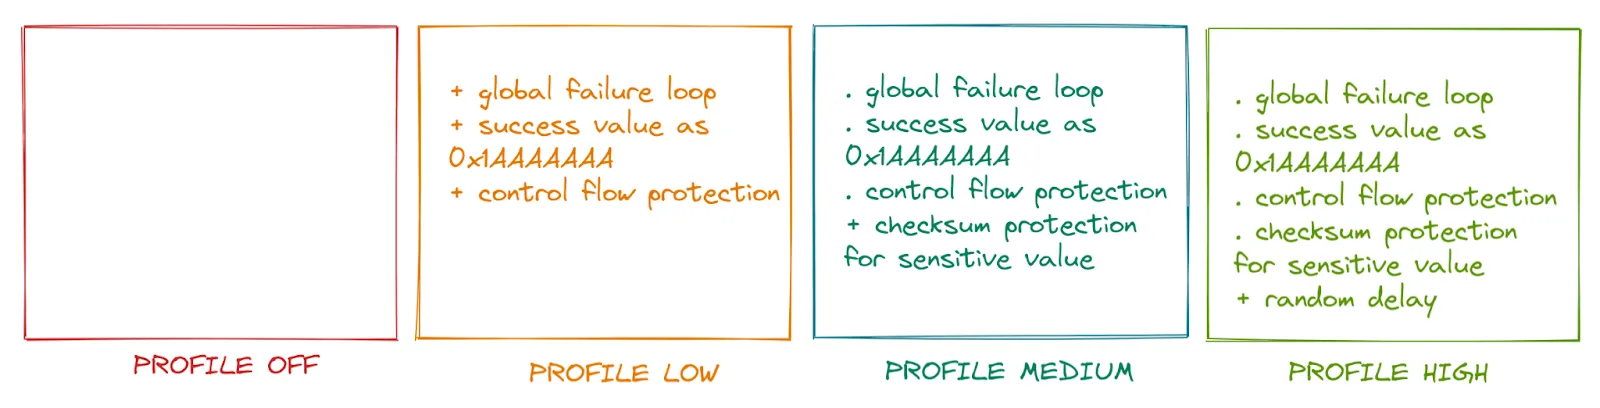
To meet developers' needs, MCUBoot offers four security modes, referred to as profiles. Each profile incorporates progressively more countermeasures: OFF, LOW, MEDIUM, and HIGH.
Below is a brief outline of these profiles, which are detailed in the file boot/bootutil/src/fault_injection_hardening.c
Additionally, a mechanism called control flow integrity is added to counter attacks that disrupt sensitive operations. This mechanism uses a global counter named _fih_cfi_ctr which is incremented before and decremented after calls to vulnerable functions. The counter is checked for consistency upon return, entering the "global failure loop" if an inconsistency is detected.
By understanding and implementing these profiles, developers can significantly enhance the security of their IoT devices against fault injection attacks.
Now it's time to proceed with our experiment. Which profile will we target, and what types of faults will we use for the attack?
The goal is to execute the attack scenario 2, as described in part 1:
1️⃣ We want to force the bootloader to accept our own (malicious) code when jumping occurs.
2️⃣ To prevent this, the bootloader implement a signature verification to check the code authenticity.
3️⃣ The signature verification is therefore the main target. Compromising the verification will allow us to take control of the device.
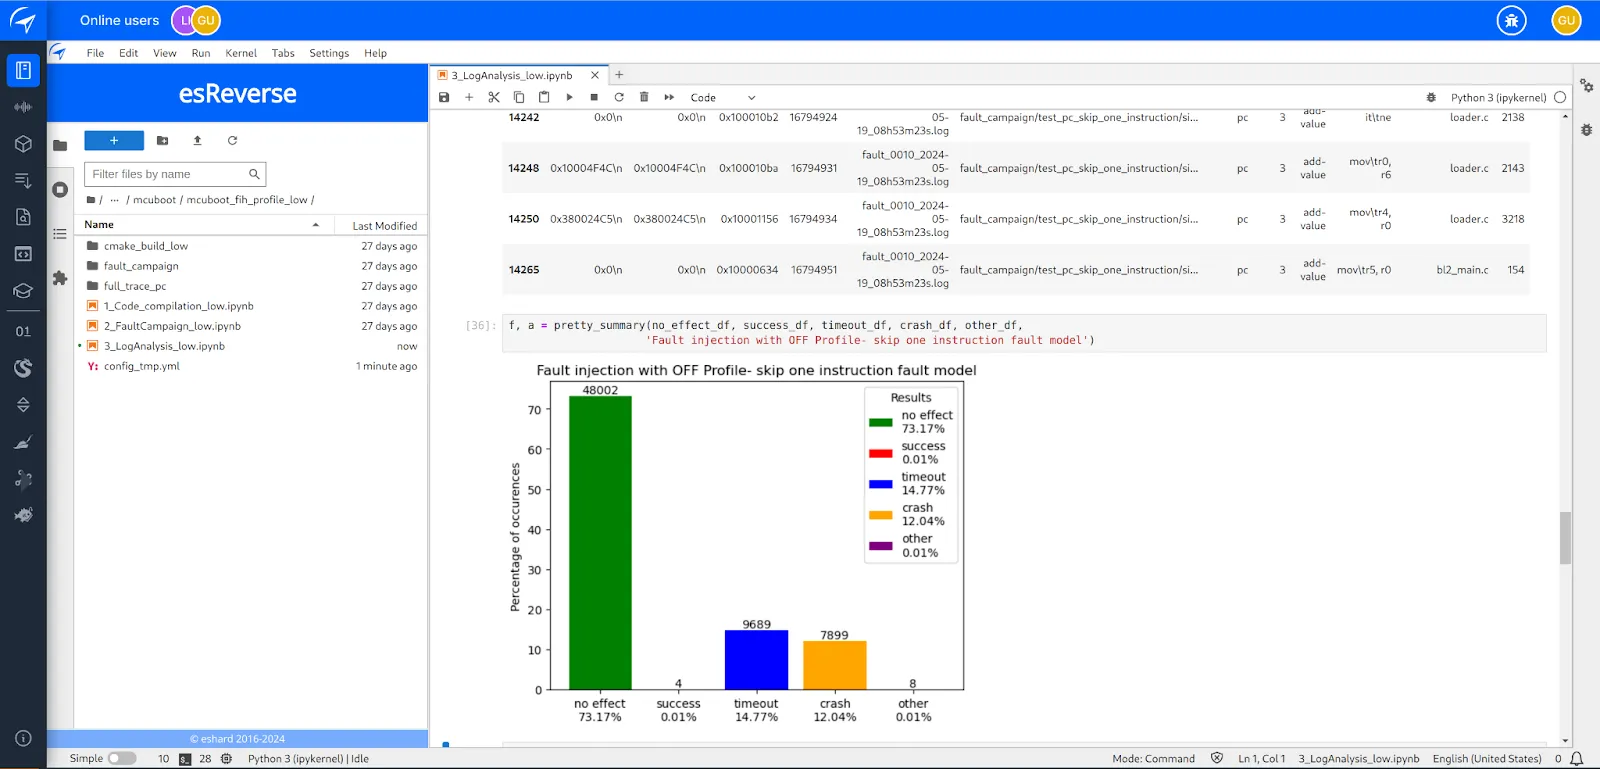
The setup for this attack was detailed in part 2 using MCUBoot v1.9.0 compiled with the OFF fault injection protection profile:
1️⃣ From the code binary, more than 17 millions of instructions are executed to perform the signature verification. We employed a strategy to reduce our attack area to 66,000 instructions.
2️⃣ R0 register value is checked. if 0 is achieved, it means that the attack was successful.
Wouldn't it be interesting to attack not only the OFF profile but also the LOW and MEDIUM profiles and compare the results? Let’s do it! We'll have a look at the binary. For this, we pushed MCUBoot binary code in Ghidra, using esReverse, and applied some disassembly to analyze the code:
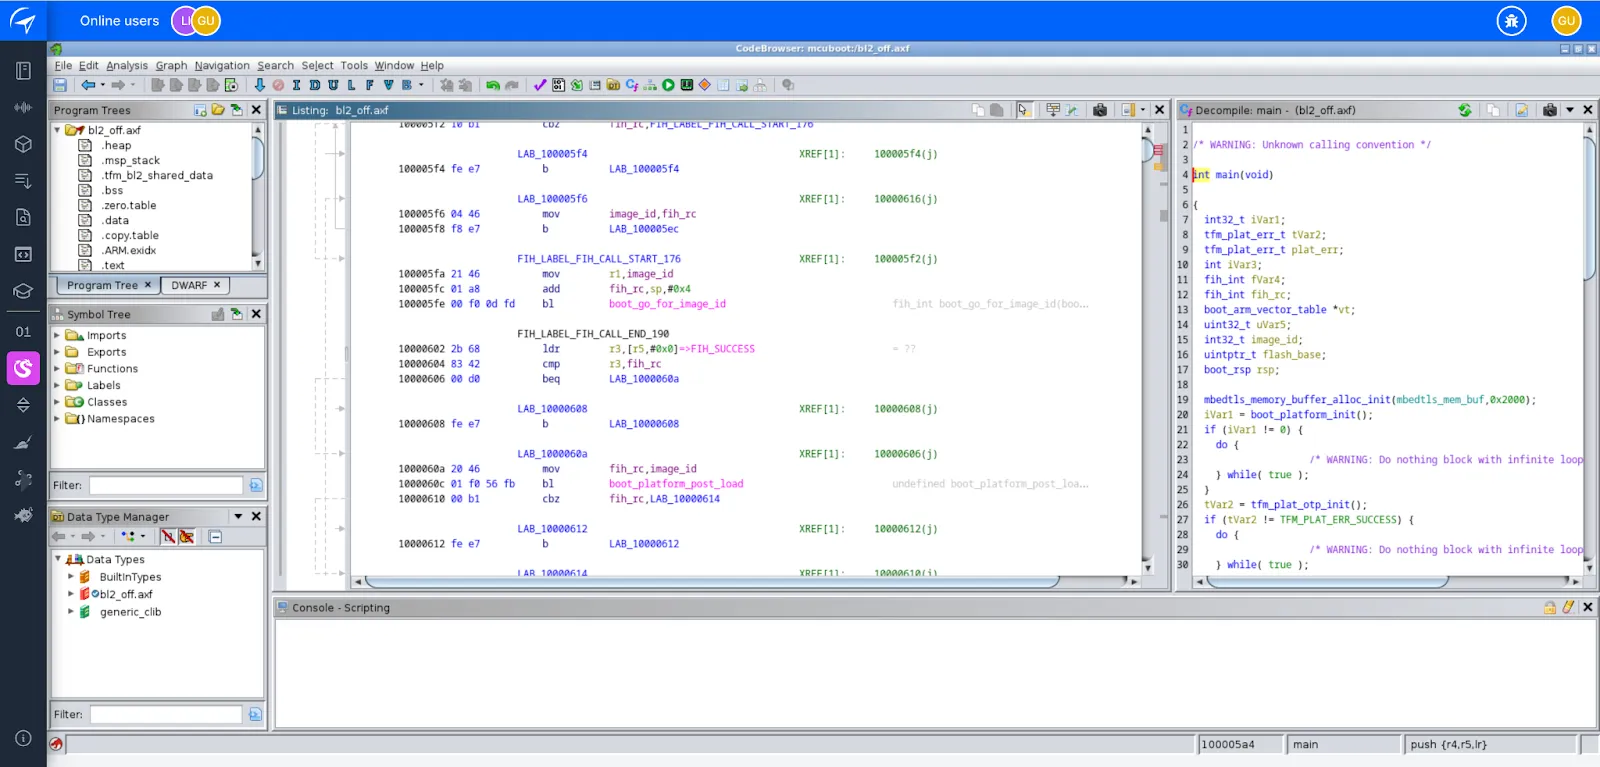
This created no difficulties, and we were able to find out the correspondences between the source code and the resulting binary. The code below demonstrates how the signature verification result is analyzed for the different profiles to determine the success or failure of the operation.

OFF Profile

LOW Profile
MEDIUM Profile
Consequently, the same methodology is applied as for the OFF profile to set up the attacks, with just two main differences to consider:
We will proceed with three fault models because they have proven effective:
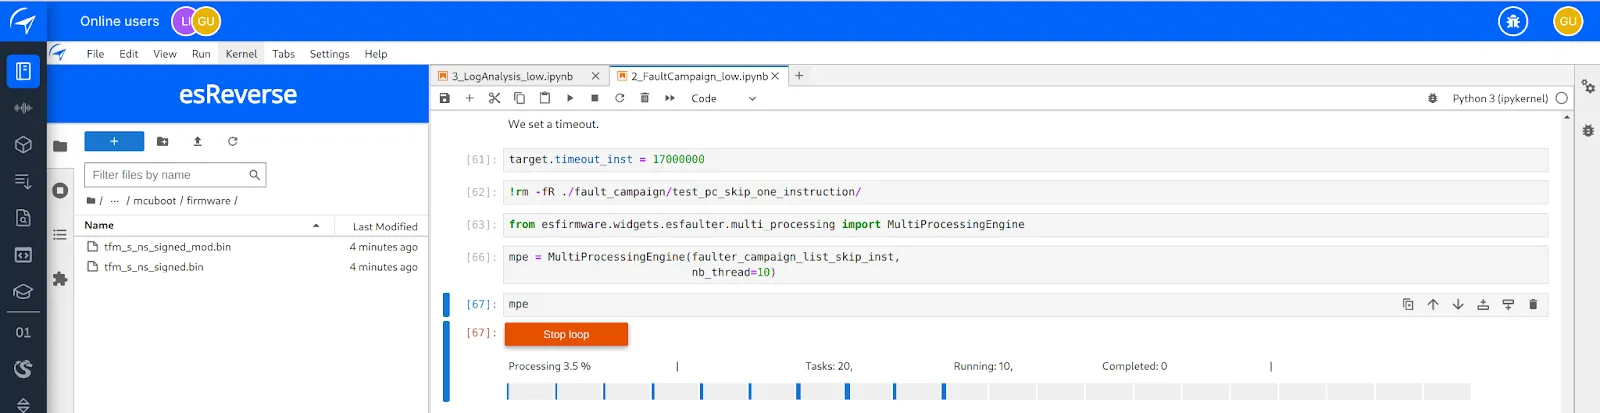
We will inject a large number of faults. Before starting the attack, let’s quickly discuss some tips to optimize our fault injection campaign.
Optimizing a fault injection campaign is crucial for efficiency and effectiveness. In our case, we use three main cumulative strategies:
1️⃣ Multi-Processing: We distribute the attacks across 20 cores to significantly speed up the process.
2️⃣ Context Saving: Instead of restarting the emulation from the beginning for each injected fault, we save the emulation context just before injecting a fault. For subsequent emulations, we can reload the context and start from the specific instruction where the fault is introduced. This optimization is particularly valuable for large programs, reducing the overhead of repeatedly emulating the entire program.
By implementing these strategies, we can efficiently conduct our fault injection campaign, saving time and resources while ensuring accurate results.

For each profile, the duration of the fault injection campaign is nearly the same. For instance, with the OFF profile:
From a combinatory point of view, we are talking about executing 65,000 (number of instructions) x 15 (number of registers) x 2 (number of fault models) = 1,820,000 times the same program (remember that more than 17 millions of instructions are executed during one emulation).
The computations were performed on an Intel(R) Xeon(R) CPU E5-2680 v4 @ 2.40GHz platform with 20 cores.
Thanks to the optimizations described previously, the full campaign reached a reasonable time: 6 hours were necessary to cover the comprehensive test campaign. Without the optimizations, we estimated that the same would have taken days of computations.
Here are the results of the fault injection campaign for each profile. On the left, you can see the results for the skip fault model, while on the right, we have combined the results for the set value fault model into one graphic. The results are classified into several categories:
By examining these results, we can gain valuable insights into the effectiveness of the fault injection countermeasures across different security profiles.
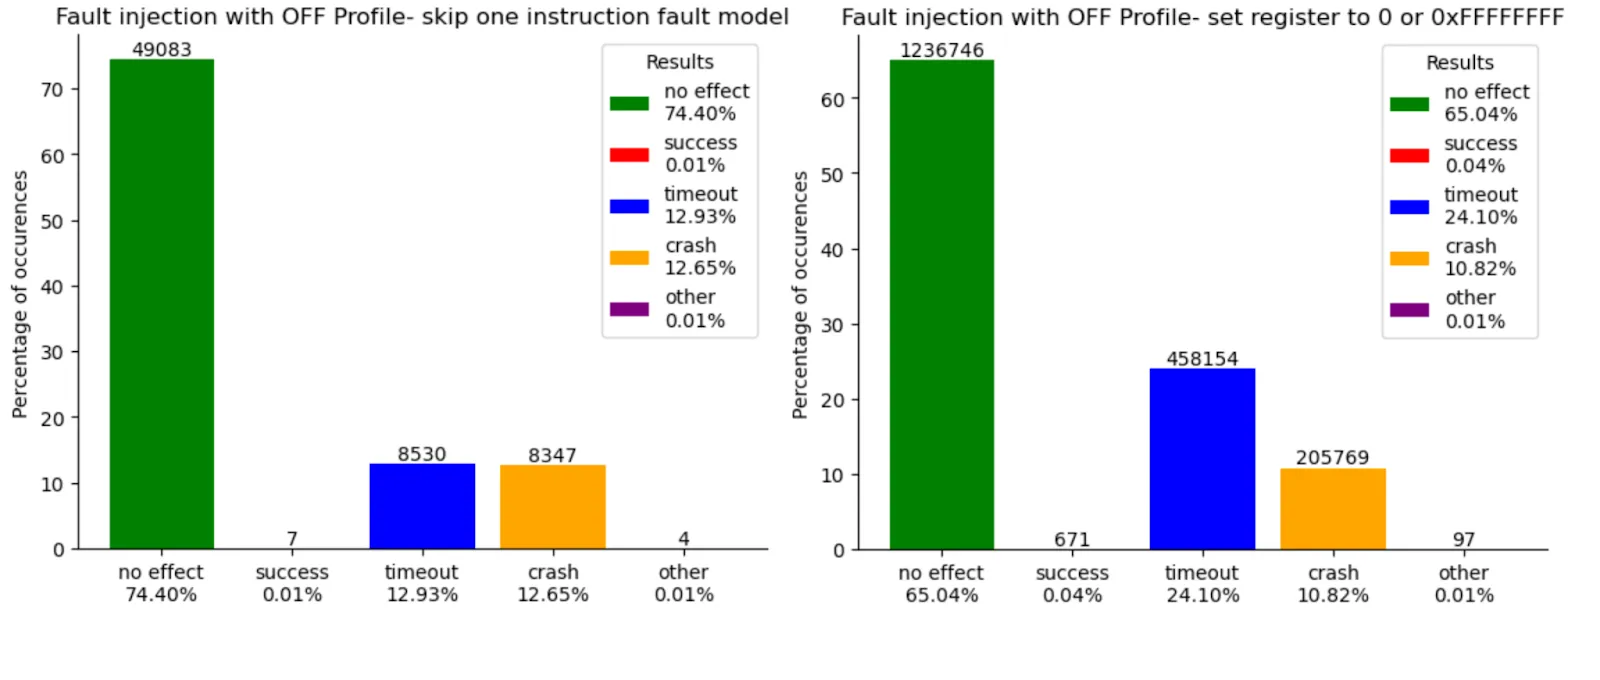
Results for OFF Profile (no protection)
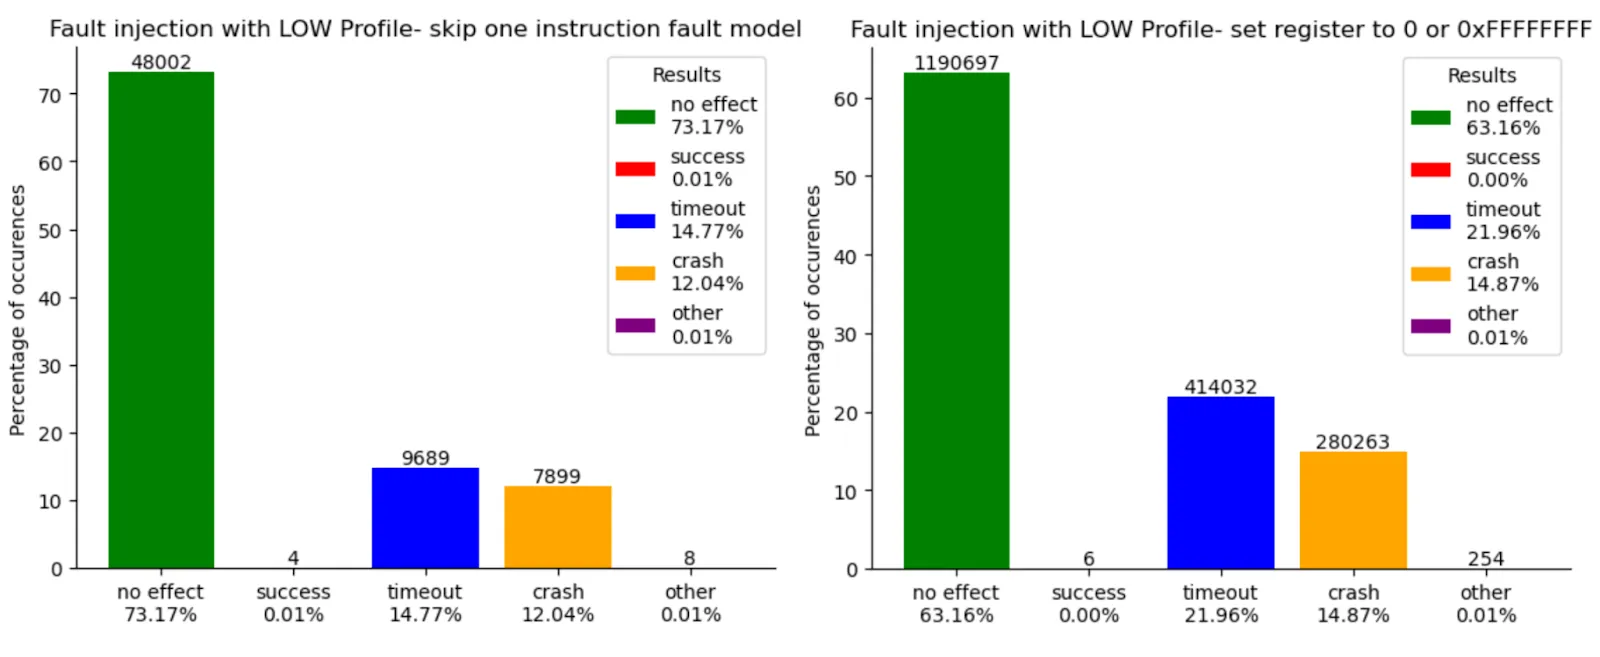
Results for LOW Profile (magical values)
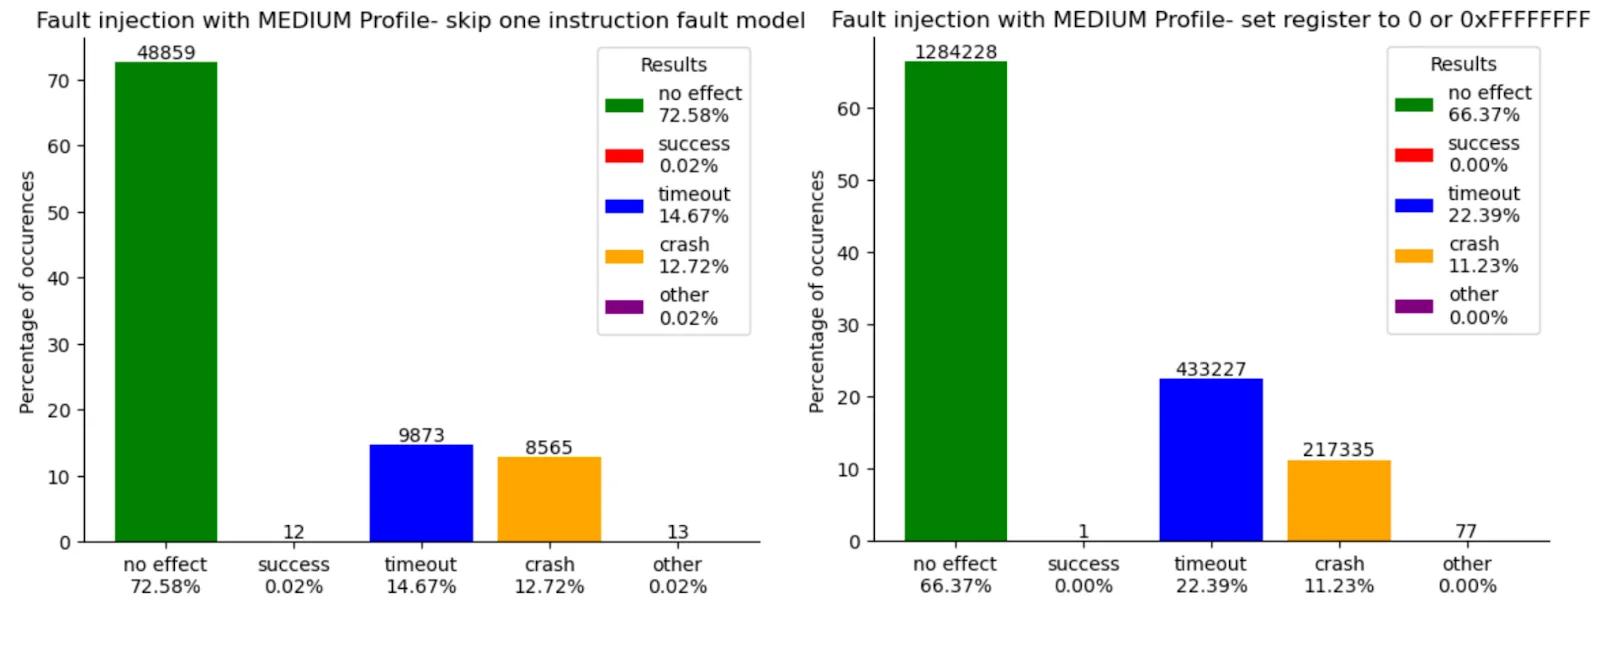
Results for MEDIUM Profile (magical values + redundancy)
First, increasing the protection levels leads to an almost complete disappearance of successful faults for fault models that set a register to 0x0 or 0xFF. With the OFF profile, there are 671 successful faults, which makes sense since the value indicating success is 0. For the LOW profile, where the success-indicating value is 0x1AAAAAAA, the number of successful faults drastically decreases to 6. This confirms the relevance of such secure coding. The MEDIUM profile, which adds checksum protection to the integers encoding the results, logically reduces this number further, but one instance remains where a fault can successfully affect the implementation.
The most surprising result pertains to the fault model where an instruction is skipped. Despite being classified as unsecured, the OFF profile is very resilient, with only 7 successful faults. The LOW profile, which adds control flow protection, reduces this number by just 2, resulting in 4 successful faults. However, the most puzzling outcome comes from the MEDIUM profile! The number of successful faults increases by 300%, rising to 12. Furthermore, if we sum the successful faults for each profile, we find that the LOW profile is more secure than the MEDIUM profile, with 10 successful faults compared to 13.

These results appear like a surprise. This led us to investigate the defects by reverse engineering techniques in order to anticipate a remediation.
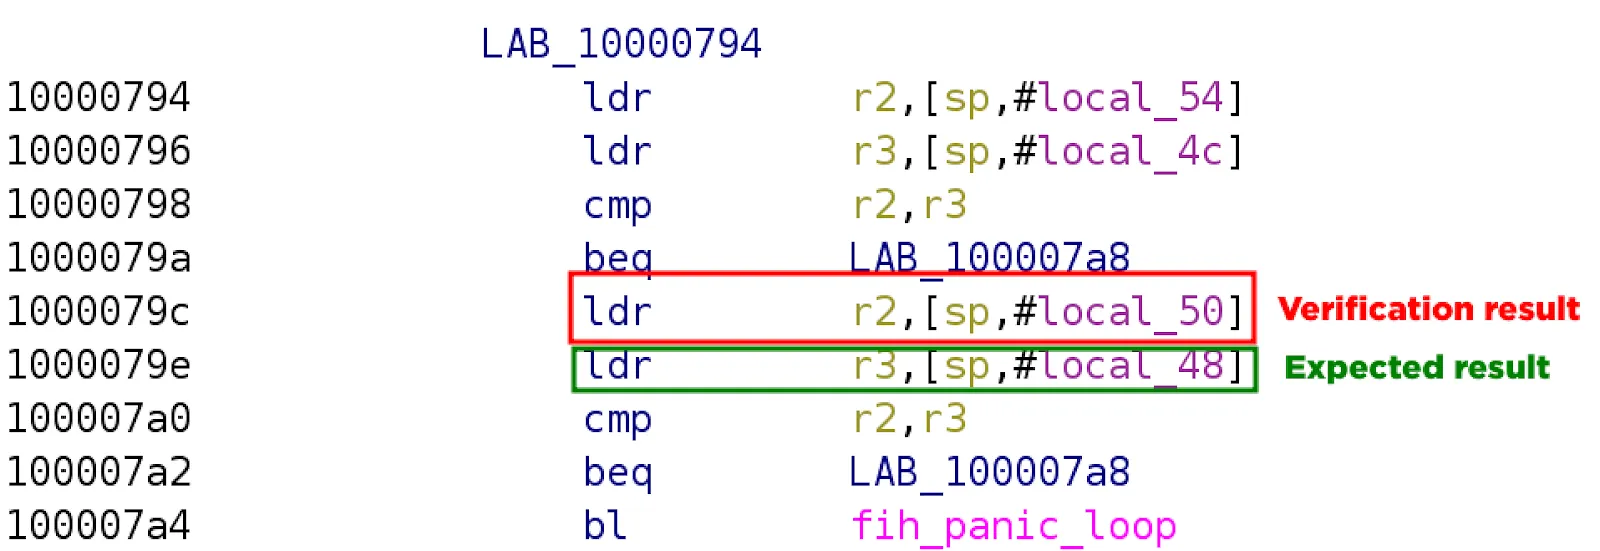
We analyzed one example, where we skip the instruction located at the address 0x100023A0, that also explains nearly all the other new cases.
First, we need to establish the context in which the fault was injected. Here is an extract of the source code where the attack occurs. The firmware signature was verified, and the result is stored in the variable valid_signature.
We then compare its value to FIH_SUCCESS to determine if the verification was successful, using the inline function fih_not_eq.
//image_valide.c:512-513
   fih_rc = fih_int_encode_zero_equality(fih_not_eq(valid_signature,
                                                    FIH_SUCCESS));
Both valid_signature and FIH_SUCCESS variables are protected with a checksum, so the function checks their checksum consistency using the inline function fih_int_validate.
// fault_injection_hardening.h:217-223
__attribute__((always_inline)) inline
int fih_not_eq(fih_int x, fih_int y)
{
   fih_int_validate(x);
   fih_int_validate(y);
   return (x.val != y.val) && fih_delay() && (x.msk != y.msk);
}

// fault_injection_hardening.h:184-190
__attribute__((always_inline)) inline
void fih_int_validate(fih_int x)
{
   if (x.val != (x.msk ^ _fih_mask)) {
       FIH_PANIC;
   }
}
Finally, it compares both the values and their checksums to determine if they are different (The function fih_delay is ineffective here). Sounds good, right?
Now, let's go back to when we performed our fault injection where we skipped the instruction located at the address 0x100023A0. Below is an extract of the relevant assembly code that we must analyze to understand the fault injection.
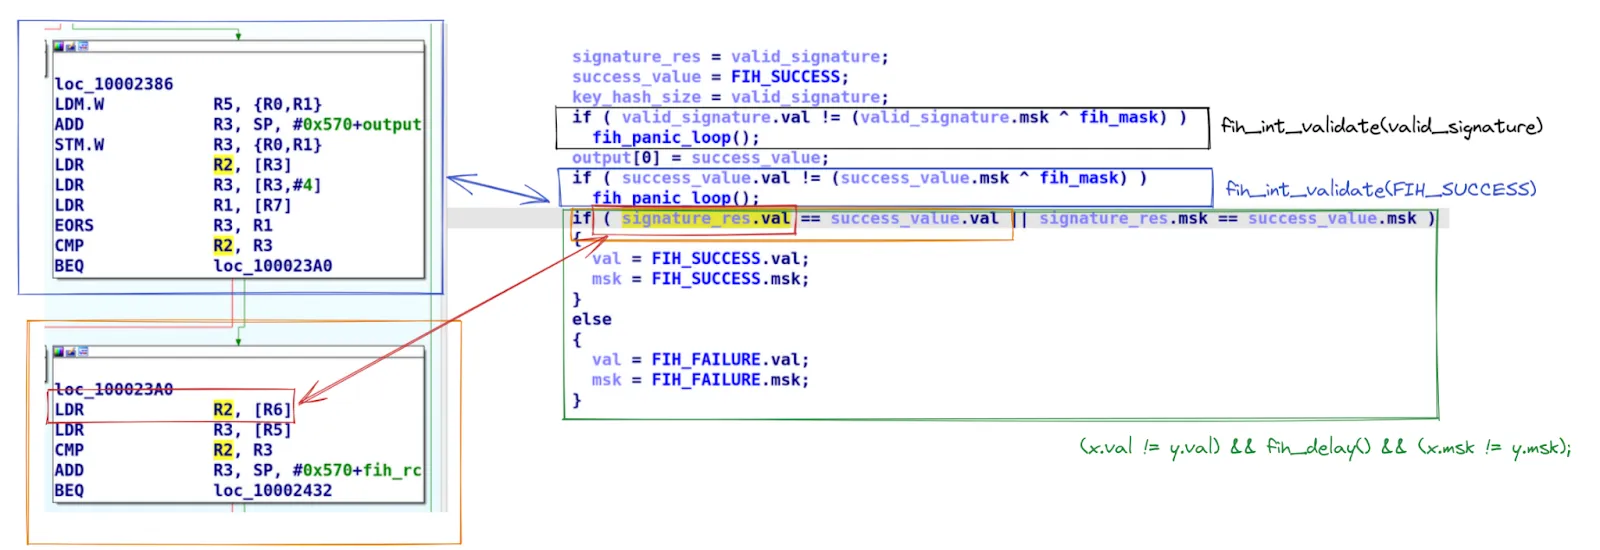
Just before the instruction, we have checked the variables checksum with the function fih_int_validate. So, valid_signature indicates that the signature verification failed. Now, we are going to check if the values signature_res.val and success_value.val are equal, an operation that is going to be impacted by our attack:
signature_res.val value into R2. Then the next instruction loaded the success_value.val value into R3, and both registers were compared by the next instruction.success_value, meaning R2 contained the value success_value.val. So, R2 and R3 contain the same value, and the comparison succeeds!fih_not_eq is not resilient to fault injection.So, we encountered an interesting case where the addition of a countermeasure against fault injection actually made the code more susceptible to fault injection! A quick fix would be to modify the fih_not_eq function so that it does not require both the value and checksum to be different, but rather either the value or the checksum. This solution was proposed by Michael Grand in January 2023 in commit 5047f03.
// 218
#define FIH_NOT_EQ(x, y) ((x != y) || !fih_delay() || !(y == x))
Without validation, a protection is nothing!
The different protection levels from ARM are meaningful. They leverage good practices from the field. But they cannot be confirmed without a proper and systematic verification. And our experimentations clearly showed the code vulnerabilities. Worse, the most secure MEDIUM profile had more vulnerabilities than the LOW profile. The HIGH profile would have just created a bit of delay but DOES NOT remove the vulnerabilities.
These vulnerabilities are the result of fairly generic fault models (instruction skip, register zeroing, or setting to 0xFFFFFFFF). With such vulnerabilities, the risk of a practical application on real devices is high. Such code should have passed a quality process.
In short, these results show that validating protections MUST be part of a development process in sensitive IoT products. This requires specific tooling and expertise to achieve this. This must be thoroughly integrated into a development cycle. Our choice was to leverage a code binary emulation together with an efficient fault injection engine (see: esReverse). Exhaustivity can be achieved and the opportunity to analyze the code in case of defects. Indeed, it was possible to pinpoint the exact address leading to a successful fault injection and to analyze using reverse engineering techniques, either static or dynamic.
This analysis was made on version 1.9.0. Since then, a new MCUBoot version 2.01 was released in April 2024. It includes security updates from commit 5047f03. We did not have the opportunity to check their strengths at this stage. But for sure, it would need such kind of verification, like any version released in the future.