Pierre Mondon
|
0
|
September 24, 2024


Let’s document our journey for instrumenting a web-interface of a router firmware, namely Tenda AC15. Our goal is to emulate the firmware and reproduce the vulnerability CVE-2024-2815.
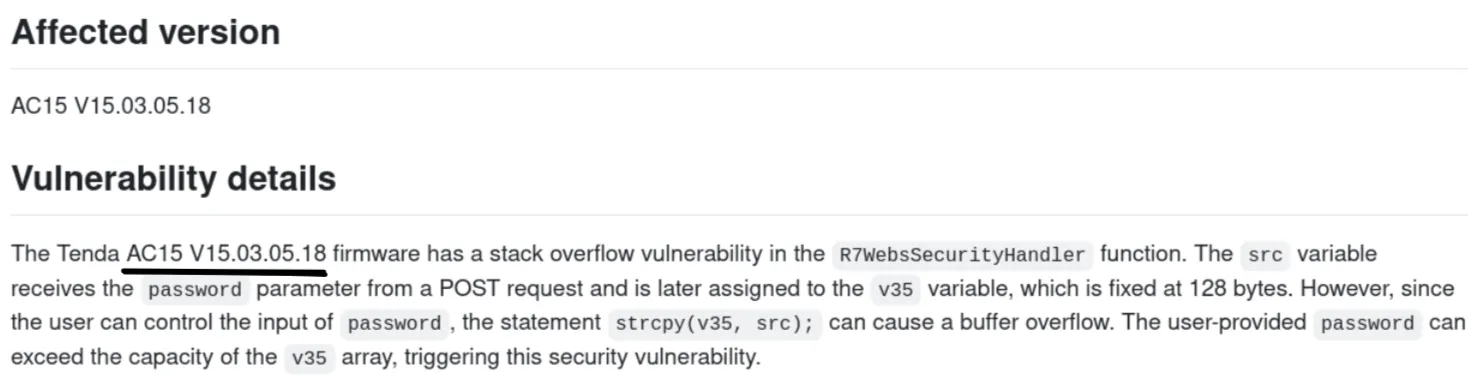
This vulnerability is reported as a stack based buffer overflow in the function R7WebsSecurityHandler of the router’s web interface. A Proof of concept is associated to this CVE and is publicly available here.
In order to quickly analyse this vulnerability, we wanted to use the time travel analysis tool of esReverse. esReverse works on a full-system emulation. However, in some circumstances, we are only interested in a small part of that system. This is the case for userland applications for which only analysing that application can be handy. Indeed, only analysing the userland application reduices the size of the trace generated during recording, hence, speeding up the analysis process and scoping the trace to fined-tuned information specific to the analyst’s task.
This was the motivation for interfacing Qiling and esReverse.
In the following, we will start by explaining how we extracted the firmware and go through the important components for this emulation. Second, we will present Qiling and Reven-unicorn. Third we will detail the thought process for interfacing the two tools, both explaining the solution and explaining the journey and issues we faced connecting them.
This is where we have the first discrepancy. Indeed, the reported CVE (on vulnDB) mentions Tenda AC15 15.03.20_multi.

However, the POC on Github mentions AC15 V15.03.05.18.
As the proof of concept is based on the firmware version AC15 V15.03.05.18 we chose to stick with it. The firmware is publicly available here.
The firmware extraction is straight forward as it is not encrypted:


wget "https://static.tenda.com.cn/tdcweb/download/uploadfile/AC15/US_AC15V1.0BR_V15.03.05.18_multi_TD01.zip"
unzip "US_AC15V1.0BR_V15.03.05.18_multi_TD01.zip"
binwalk -e "US_AC15V1.0BR_V15.03.05.18_multi_TD01.bin" 2>/dev/null
Let’s explore that filesystem, or at least the interesting files and folders for our webinterface emulation.
First, /etc_ro/init.d/ is a directory containing scripts launched at startup. In this firmware there is only one script: rcS.
Here are the interesting part of that script for us:
cp -rf /webroot_ro/* /webroot/
...
cfmd &
The directory webroot_ro/ is copied to webroot/. It contains the content for the web interface such as html, css, javascript files and images.
The script then starts a program called cfmd that will launch our webserver. As we know that the vulnerability lies in the function R7WebsSecurityHandler, we can search for that string in the filesystem and we got lucky:
# fgrep -r R7WebsSecurityHandler
grep: bin/httpd: binary file matches

# fgrep -r httpd
grep: lib/libpal_vendor.so: binary file matches
grep: lib/libcommon.so: binary file matches
grep: bin/netctrl: binary file matches
grep: bin/dhttpd: binary file matches
grep: bin/httpd: binary file matches
grep: bin/alibaba_update: binary file matches
grep: bin/time_check: binary file matches
grep: bin/business_proc: binary file matches
grep: bin/cfmd: binary file matches
grep: usr/sbin/smbd: binary file matches
As we can see, the vulnerable function is situated in the httpd binary. Now we try to understand how is launched that web interface. It turns out it is launched by cfmd (itself launched on startup via rcS in the init.d folder).
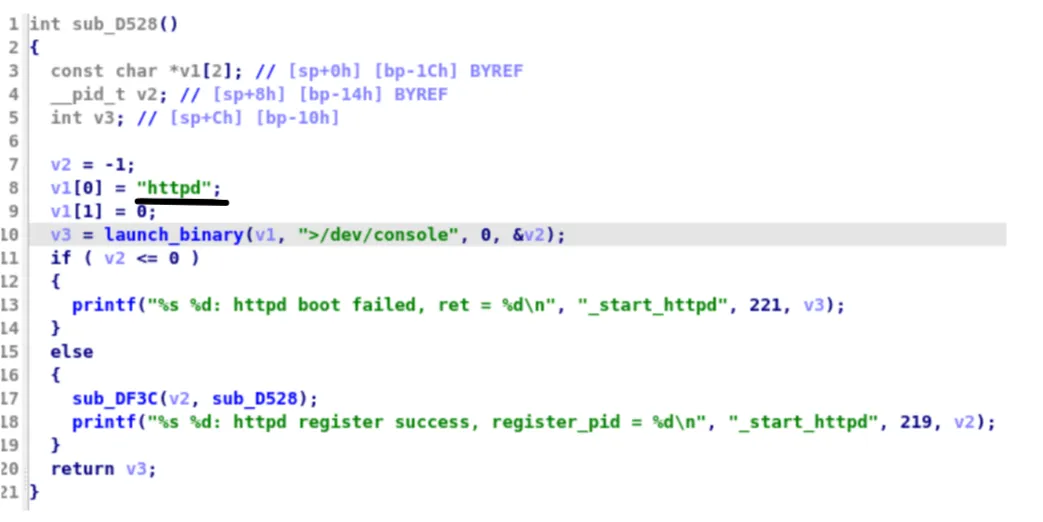
It turns out the binary is not launched with any parameters. We can now focus on emulating that binary as we have all the necessary information on the context in which this web interface runs.
We will get to that, but first let’s contextualise the emulation tools that we will use.
Qiling is described by its authors as "A True Instrumentable Binary Emulation FRAMEWORK". This framework allows you to emulate a binary in the context of an operating system.
Basically, emulating a binary with Qiling requires four elements:
The filesystem will be taken by Qiling as a basis for the system emulation. That is, if your binary requires libraries, they should be placed in the filesystem given to Qiling. Similarly, Qiling uses the interpreter from the given filesystem to load the needed libraries in the memory for the target binary. The configuration file contains meta-information for Qiling to perform the emulation.
Here is an example given by Qiling for Linux:
[CODE]
# ram_size 0xa00000 is 10MB
ram_size = 0xa00000
entry_point = 0x1000000


[OS64]
stack_address = 0x7ffffffde000
stack_size = 0x30000
load_address = 0x555555554000
interp_address = 0x7ffff7dd5000
mmap_address = 0x7fffb7dd6000
vsyscall_address = 0xffffffffff600000


[OS32]
stack_address = 0x7ff0d000
stack_size = 0x30000
load_address = 0x56555000
interp_address = 0x047ba000
mmap_address = 0x90000000


[KERNEL]
#uid = 1000
#gid = 1000
uid=0
gid=0
pid = 1996


[MISC]
current_path = /


[NETWORK]
# override the ifr_name field in ifreq structures to match the hosts network interface name.
# that fixes certain socket ioctl errors where the requested interface name does not match the
# one on the host. comment out to avoid override
ifrname_override = eth0

# To use IPv6 or not, to avoid binary double bind. ipv6 and ipv4 bind the same port at the same time
bindtolocalhost = True
# Bind to localhost
ipv6 = False
For most of your needs this configuration file will do the trick. The only needed modification will be the ifrname_override which is the network interface on which Qiling should work. Qiling will redirect the port 80 on the emulated binary to the port 8080 of the host by default.
We will start by stating that the Qiling script for httpd and Tenda was already available on Qiling example list (here).
This script simply implements a server that accepts incoming connection on /var/cfm_socket and sends with connection.send(b'192.168.170.169') to each connected client. For our example, it turns out we do not need to investigate further the purpose of that server. Even when logging all the data received through that socket there is nothing. We know that if this server doesn’t exist, httpd quits early during the initialisation phase as it tries to establish a connection.
The scripts also leverages the filesystem mapping feature of Qiling to map the /dev/urandom of the emulate filesystem to the host /dev/urandom. Practically, this allows the emulated system to have access to similar randomness generation through the host machine as it would have on the actual router.
Last, the script maps the syscall vfork to a function returning 0:
        def __vfork(ql: Qiling):
            return 0

        ql.os.set_syscall('vfork', __vfork)
This script, in combination with the filesystem, is enough to emulate our httpd server. Note that in that extracted filesystem you should run that command to immitate the work of the init.d script:
cp -rf $(path to your extracted filesystem)/webroot_ro/* $(path to your extracted filesystem)/webroot/Now we have a working emulation of httpd in Qiling with that Qiling script:
import os
import socket
import threading
import pathlib
import sys
sys.path.append(".")

from qiling import Qiling
from qiling.const import QL_VERBOSE, QL_INTERCEPT


def nvram_listener():
    server_address = fr'{ROOTFS}/var/cfm_socket'

    if os.path.exists(server_address):
        os.unlink(server_address)

    # Create UDS socket
    sock = socket.socket(socket.AF_UNIX, socket.SOCK_STREAM)
    sock.bind(server_address)
    sock.listen(1)

    data = bytearray()

    with open('cfm_socket.log', 'wb') as ofile:
        while True:
            connection, _ = sock.accept()

            try:
                while True:
                    data += connection.recv(1024)

                    if b'lan.webiplansslen' not in data:
                        break

                    connection.send(b'192.168.170.169')

                    ofile.write(data)
                    data.clear()
            finally:
                connection.close()

def my_sandbox(path, rootfs):
    ql = Qiling(path, rootfs, verbose=QL_VERBOSE.DEBUG)
    ql.add_fs_mapper(r'/dev/urandom', r'/dev/urandom')
    if ql.debugger:
        def __vfork(ql: Qiling):
            return 0

        ql.os.set_syscall('vfork', __vfork)

    try:
        ql.run()
    except Exception as e:
        print(e)

nvram_listener_thread = threading.Thread(target=nvram_listener, daemon=True)
nvram_listener_thread.start()

my_sandbox([fr'{ROOTFS}/bin/httpd'], ROOTFS)
With that script we can reproduce the vulnerability CVE-2024-2815. Note that the Qiling script crashes when sending the vulnerable query, this is normal, bear in mind we are reproducing a crash.
Reven-unicorn is a tool developped by eShard that can generate esReven traces based on a Unicorn emulation. For those that are new here, esReverse is a time travel analysis solution with both a python API and a dedicated GUI. That GUI allows you to visualise code through time in contrast with tradionnal tools in which you have to imagine the time passing in the pictured code.
Giving a handle on the Unicorn object of Qiling to Reven-unicorn will automatically record the registers throughout the emulation. Reven-unicorn allows you to map memory, trace memory reads and write through an API. It is important to note that Reven-unicorn does not yet support memory re-mapping or mapping during the recording, that is, all memory mapping needs to be done before the recording starts.
Now we have a working emulation environment let’s instrument our target for Time Travel Analysis. We will dive into our thought process when we first interfaced the two tools.
As Reven-unicorn and Qiling are both based on Unicorn. Our thought process was: “Both are using Unicorn must not be too hard to interface them”
After a bit of digging around, we came to the following logic:
The first step was straight forward:
import reven_unicorn
...
def my_sandbox(path, rootfs):
    ql = Qiling(path, rootfs, verbose=QL_VERBOSE.DEBUG)
    ql.add_fs_mapper(r'/dev/urandom', r'/dev/urandom')

    #### Added by eshard
    rvn_handle = reven_unicorn.alloc(ql.uc)
    err = reven_unicorn.start_tracing(rvn_handle)
    ####

    if err != reven_unicorn.Error.OK:
        print(f"Error when starting the tracing: {err}")
        sys.exit(1)

    if ql.debugger:
        def __vfork(ql: Qiling):
            return 0

        ql.os.set_syscall('vfork', __vfork)

    try:
        ql.run()
    except Exception as e:
        print(e)
    finally:
        #### Added by eShard
        err = reven_unicorn.free(rvn_handle)
        if err != reven_unicorn.Error.OK:
            print(f"Error when freeing the handle: {err}")
            sys.exit(1)
        ####
Simply following the guilines on how to use Reven-unicorn we were able to record the states of the registers throuhought the entire emulation. We were “only” missing the memory record.
It turns out, esReverse itself is pretty handy to debug our recording. Using the time travel GUI, we figured out the following: When a looking at a memory address in esReverse GUI, if it contains ??, that means that memory region is not mapped.
Remember that we cannot map memory during the tracing, so we needed to understand the memory layout of the Qiling emulation before the emulation happens. Also, remember that Qiling takes a configuration file as argument? Well, that describes the memory layout for the emulation (almost entirely). We leverage that to map the memory prior recording in reven_unicorn:
    stack_addr = int(ql.profile.get("OS32", "stack_address"), 16)
    stack_size = int(ql.profile.get("OS32", "stack_size"), 16)
    load_addr = int(ql.profile.get("OS32", "load_address"), 16)
    interp_addr = int(ql.profile.get("OS32", "interp_address"), 16)

    # mmaps
    err = reven_unicorn.mem_map(rvn_handle, stack_addr, stack_size, True)
    err = reven_unicorn.mem_map(rvn_handle, load_addr, 0x1000000, True)
    err = reven_unicorn.mem_map(rvn_handle, interp_addr, 0x100000, True)
    err = reven_unicorn.mem_map(rvn_handle, mmap_addr, 0x1000000, True)
Because we don’t know exactly how much memory will be used at each adress we simply map a large region, except for the stack size that is given to us by Qiling.
Now, when inspecting the recording in esReverse GUI, the memory is mapped and turns from ?? to 00. Which means that the memory simply was never written to (in the recording).
Because Qiling is an analysis framework, not only does it emulate the system, it also offers a wide range of analysis possibilities. Amongs which, mem_write
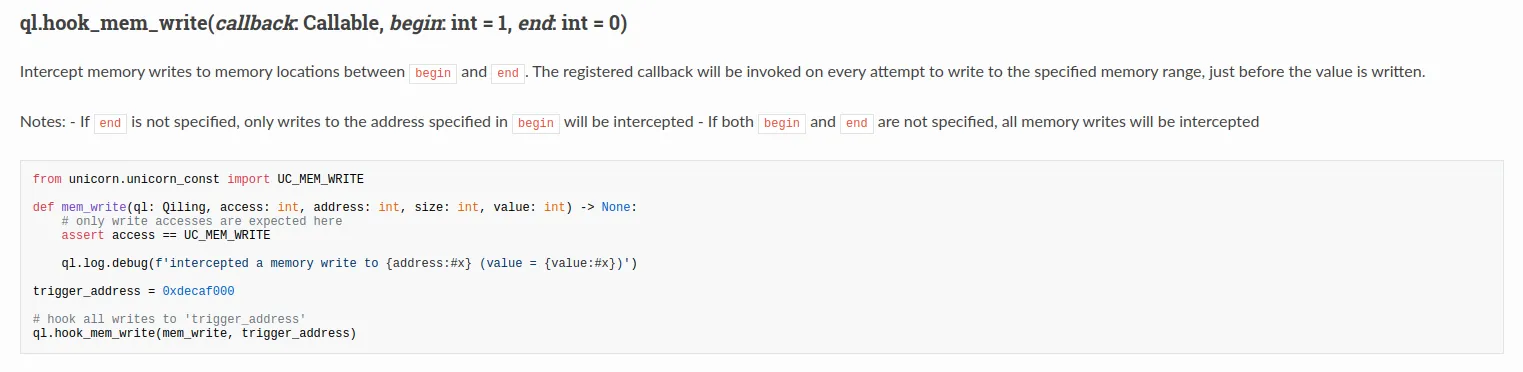
This hook is exactly what we need to register all the writes during the emulation of httpd (or is it?). In order to leverage this capability, we simply register our callback to be called at every memory writes. In that callback we call reven_unicorn.mem_write(), which is the reven_unicorn function to trace a memory write.
def callback_reven_write(ql, access, offset: int, size: int, value: int):
    err = reven_unicorn.mem_write(rvn_handle, offset, struct.pack("<I", value))


def setup_reven(ql, binary):
    global rvn_handle
    global block_hook
    rvn_handle = reven_unicorn.alloc(ql.uc)
    ql.hook_mem_write(callback_reven_write)
Note that we pack the value to handle endianness as our emulation is in little endian (you may have to adapt that to suite your exact usecase).
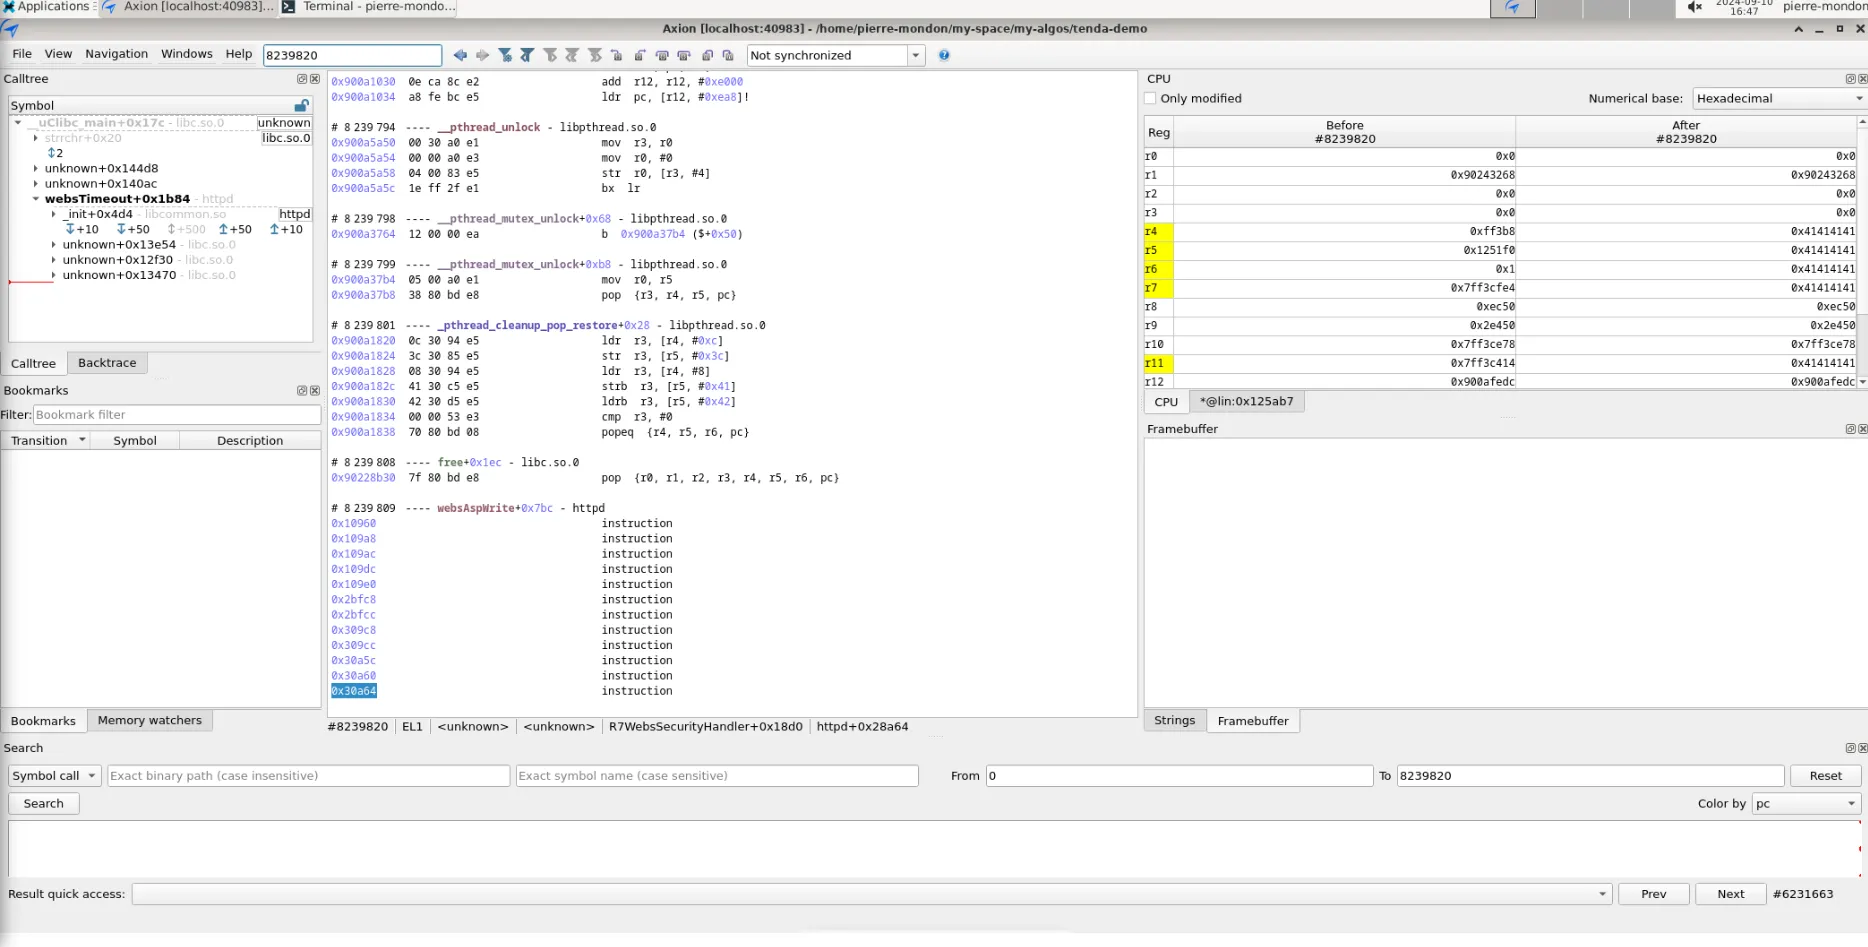
Well… We have most of the emulation figured out but we are missing a small part: the code ???
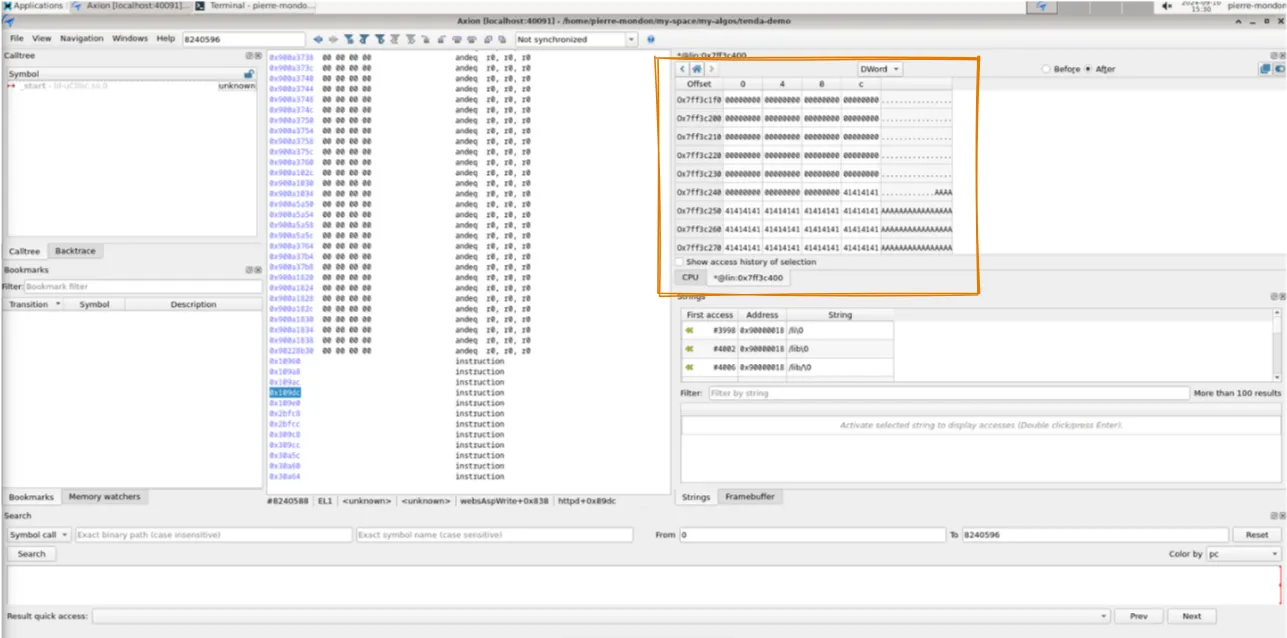
As we can see on that view. The content of the stack on the memory view is correct, we have our input buffer thanks to our memory callback, we could even see the history of access of an address in the memory view. However, the disassembly isn’t there.
We leveraged the debugging output of Qiling to understand what was going on. At this stage, we know we are missing some writes in the memory, in particular, the loading of the code in memory.
[+]     0x047bc7c0: munmap(addr = 0x90001000, length = 0x1000) = 0x0
[+]     Received interrupt: 0x2
[+]     open("/lib/libvos_util.so", 0x0, 00) = 3
[+]     0x047bbd64: open(filename = 0x7ff3c308, flags = 0x0, mode = 0x0) = 0x3
[+]     Received interrupt: 0x2
[+]     0x047bbda8: fstat(fd = 0x3, buf_ptr = 0x7ff3c2a0) = 0x0
[+]     Received interrupt: 0x2
[+]     0x047bbe78: mmap2(addr = 0x0, length = 0x1000, prot = 0x3, flags = 0x4000022, fd = 0xffffffff, pgoffset = 0x0) = 0x90001000
[+]     Received interrupt: 0x2
[+]     read() CONTENT: b'\x7fELF\x01\x01\x01\x00\x00\x00\x00\x00\x00\x00\x00\x00\x03\x00(\x00\x01\x00\x00\x00@\x0c\x00\x004\x00\x00\x00\xb0"\x00\x00\x02\x00\x00\x054\x00
...
\x00\x04\x00\x15\x00\x00\x08\x01\x00\x00\x12\x00\x08\x00\xaa\x01\x00\x00\x\x00\x00\x004\x00\x00\x00\x00\x00\x00\x00\x00\x00\x00\x00 \x00\x00\x00\xdd\x00\x00\x00\x00\x00\x00\x00\x00\x00\x00\x00\x12\x00\x00\x00\x00_init\x00_fini\x00__cxa_finalize\x00__deregister_frame_info\x00__register_frame_info\x00_Jv_RegisterClasses\x00vos_strcmp\x00vos_strcasecmp\x00vos_strncmp\x00vos_strncasecmp\x00vos_strstr\x00vos_strcpy\x00vos_strncpy\x00vos_strlen\x00vos_str_trim\x00vos_malloc\x00vos_free\x00vos_calloc\x00vos_memcmp\x00vos_memset\x00vos_memchr\x00vos_get_value_from_file\x00fopen\x00perror\x00strtok\x00fgets\x00fclose\x00vos_compare_with_wan_ip\x00inet_addr\x00ntohl\x00ipmask_to_numeric\x00ethaddr_aton\x00strtol\x00ethaddr_ntoa\x00sprintf\x00vos_get_mac_address_by_ipstr\x00sscanf\x00vos_get_mac_address_by_ip\x00vos_cale_time_active\x00localtime\x00atoi\x00vos_numbers_and_dot_ip_valid\x00puts\x00libc.so.0\x00_edata\x00__bss_start\x00__bss_start__\x00__bss_end__\x00__end__\x00_end\x00\x00\x00\x00\xa0\x00\x00\x17\x00\x00\x00\x04\xa0\x00\x00\x17\x00\x00\x00|
...\xa1\x00\x00\x17\x00\x00\x00l\xa1\x00\x00\x15\x10\x00\x00p\xa1\x00\x00\x15 \x00\xea'
[+]     0x047bbef8: read(fd = 0x3, buf = 0x90001000, length = 0x1000) = 0x1000
[+]     Received interrupt: 0x2
[+]     0x047bc150: mmap2(addr = 0x0, length = 0xb000, prot = 0x0, flags = 0x22, fd = 0xffffffff, pgoffset = 0x0) = 0x90075000
[+]     Received interrupt: 0x2
[+]     mmap2: unmapping memory between 0x90075000-0x90077000 to make room for fixed mapping
[+]     0x047bc4a4: mmap2(addr = 0x90075000, length = 0x1fd4, prot = 0x5, flags = 0x12, fd = 0x3, pgoffset = 0x0) = 0x90075000
[+]     Received interrupt: 0x2
[+]     mmap2: unmapping memory between 0x9007f000-0x90080000 to make room for fixed mapping
[+]     0x047bc324: mmap2(addr = 0x9007f000, length = 0x180, prot = 0x3, flags = 0x12, fd = 0x3, pgoffset = 0x2) = 0x9007f000
[+]     Received interrupt: 0x2
[+]     close(3) = 0
[+]     0x047bc680: close(fd = 0x3) = 0x0
[+]     Received interrupt: 0x2
[+]     0x047bc7c0: munmap(addr = 0x90001000, length = 0x1000) = 0x0
[+]     Received interrupt: 0x2
[+]     open("/lib/libz.so", 0x0, 00) = 3
[+]     0x047bbd64: open(filename = 0x7ff3c2f8, flags = 0x0, mode = 0x0) = 0x3
[+]     Received interrupt: 0x2
[+]     0x047bbda8: fstat(fd = 0x3, buf_ptr = 0x7ff3c290) = 0x0
[+]     Received interrupt: 0x2
[+]     0x047bbe78: mmap2(addr = 0x0, length = 0x1000, prot = 0x3, flags = 0x4000022, fd = 0xffffffff, pgoffset = 0x0) = 0x90001000
[+]     Received interrupt: 0x2
In these logs we can see multiple syscalls. Let us summarise this interaction:
open("/lib/libvos_util.so", 0x0, 00) = 3fd=0xffffffff(fd)=0x3 using mmap2 at 0x90075000We need to find a way to intercept these mmap2 calls. Not the ones mapping memory, but the ones that are writing in memory (with a fd != -1 or 0xffffffff you choose)
So we simply leverage Qiling API (once again) to hook every mmap2 syscalls.
def intercept_mmap2(ql: Qiling, addr, length, prot, flags, fd, offset, retval):
    global rvn_handle
    if fd != 0xffffffff and retval != -1 and flags != 0x22:
        value = ql.mem.read(addr, length)
        err = reven_unicorn.mem_write(rvn_handle, addr, bytes(value))
    return retval

def setup_reven(ql, binary):
    ...
    ql.os.set_syscall('mmap2', intercept_mmap2, QL_INTERCEPT.EXIT)
In our case this is the only syscall performing a write in memory that is not passed to the mem_write callback. In another example, you may encounter another syscall that perform a similar operation. This is why it is important to understand the thought process behind the interfacing of the two framework.
Remember, in the esReverse GUI : ?? means unmapped and 00 at a place of interest where data is supposed to be probably means you are missing a write in memory.
Well… Not really!
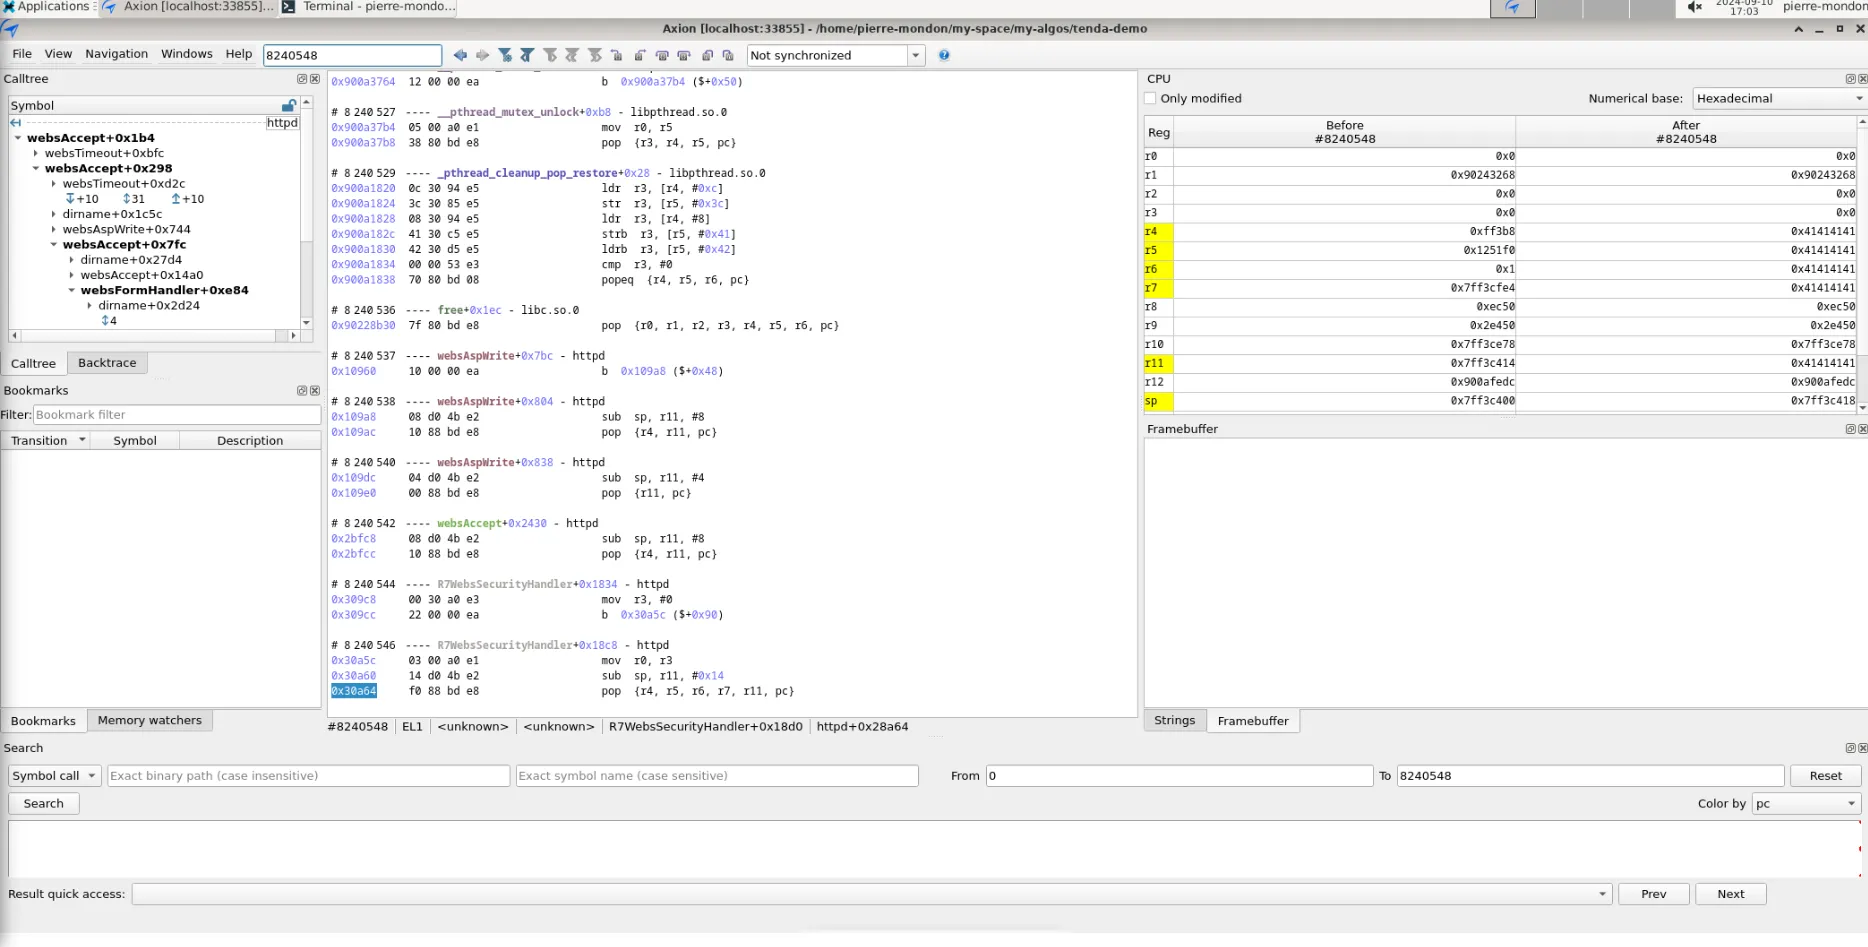
We are actually now seeing this:
And that:
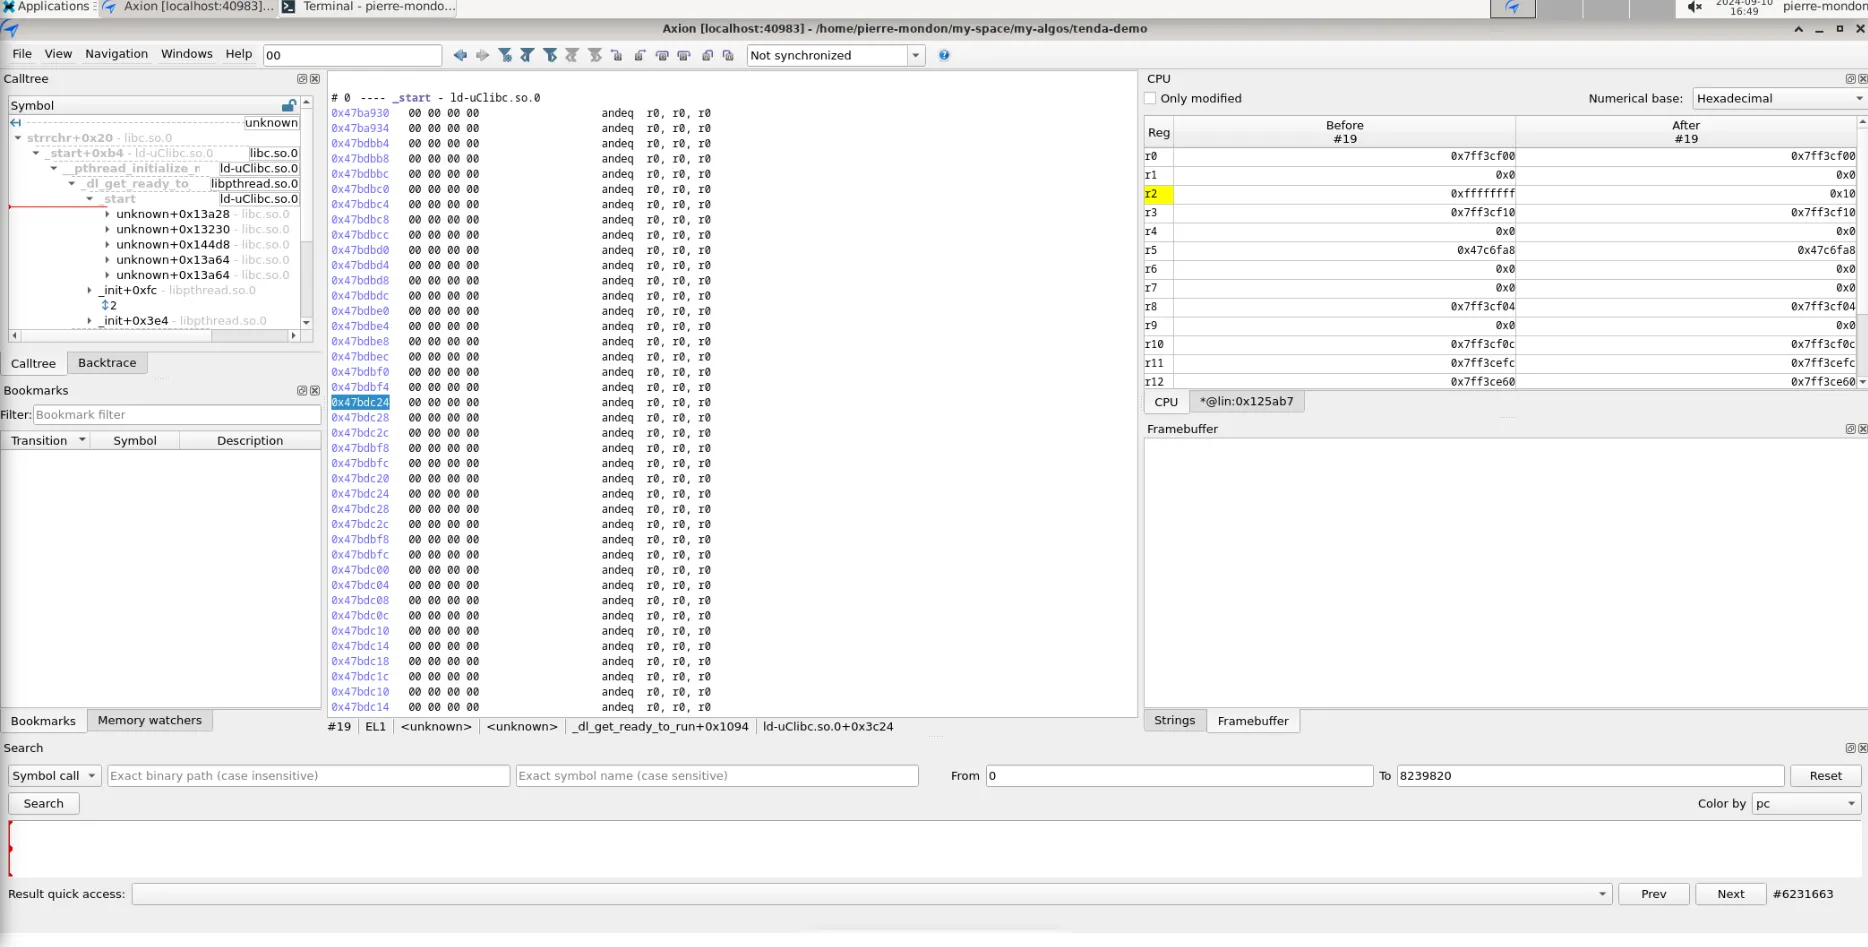
In the first picture we can see that we are still missing our target binary disassembly. As a matter of fact, its memory adress is not even mapped yet! The second picture shows the lack of disassembly on the filesystem’s interpreter, however, this time the memory adress is mapped in esReverse.
It turns out that Qiling will never give you a hook when loading these files because it is not part of the emulation from a Qiling point of view. Qiling will “manually” load these in memory, starting with the binary.
In order to load the binary, we leverage the file kernel.py chipped with reven-unicorn that contains a Binary class. This class contains a load_in_memory function, which is almost the same implementation as the binary loading function of Qiling based on the library elftools. This allows you to parse an ELF binary and load it in memory, in our case, we modified it so it does not load it in the actual unicorn memory but rather puts it in the trace using reven_unicorn.mem_map and reven_unicorn.mem_write.
If you followed correctly you may remember that we cannot mem_map once the tracing has started, this is why we need to map and write the binary as well as the interpreter before the recording starts.
file kernel.py
    class Binary
        def load_in_memory(self, uc: unicorn.Uc, rvn_handle: int, base_addr: int=0) -> None:
            for segment in self._binary.iter_segments():
                if segment.header.p_type == "PT_LOAD":
                    segment_addr = base_addr + segment.header.p_vaddr - (segment.header.p_vaddr % self._arch.page_size)
                    segment_pages = math.ceil(
                        (segment.header.p_vaddr - segment_addr + segment.header.p_memsz) / self._arch.page_size
                    )
                    segment_size = segment_pages * self._arch.page_size

                    print(f" - Segment - Address: 0x{segment_addr:x} - Size: 0x{segment_size:x}")
                    err = reven_unicorn.mem_map(rvn_handle, segment_addr, segment_size, False)
                    err = reven_unicorn.mem_write(rvn_handle, segment_addr, segment.data())
                    if err != reven_unicorn.Error.OK:
                        print(f"Error when mapping a segment: {err}")
                        sys.exit(1)
file emu_script.py
    def setup_reven(ql, binary):
        global rvn_handle
        global block_hook
        rvn_handle = reven_unicorn.alloc(ql.uc)
        binary = kernel.Binary(arch, binary)
        loader = kernel.Binary(arch, './user_light_fs/lib/ld-uClibc.so.0')
    ...
        # print(f"Entry point: {binary.entrypoint}")
        binary.load_in_memory(ql.uc, rvn_handle)
        loader.load_in_memory(ql.uc, rvn_handle, base_addr=interp_addr)
Now we have our instrumentation completed and we can analyse that vulnerability. Read the part 2 here.


